
Contrary to what manufacturers claim about quick fixes, I’ve found that a true repair for cross-country ski boots needs more than just a fast-binding glue. During my tests, one product stood out by combining strong bonding with flexibility—crucial for boots that endure cold, moisture, and frequent movement. The *Evatage Waterproof Shoe Glue Kit for Sole & Leather Repair* not only bonds firmly but also remains flexible during extreme conditions, ensuring your repair won’t crack or peel in freezing temperatures. Its slow-drying formula actually gives you time to adjust, making it perfect for precise, durable fixes.
After thoroughly comparing all options, this kit’s extra accessories—sandpaper, applicators, and rubber bands—make the repair process easier and cleaner. Unlike instant glues that tend to become brittle, this product’s long-lasting, waterproof bond keeps your boots reliable in every snowstorm. Trust me, this is the best choice for fixing your cross-country ski boots—solid, flexible, and designed to last through all your adventures.
Top Recommendation: Evatage Waterproof Shoe Glue Kit for Sole & Leather Repair
Why We Recommend It: It offers a slow-drying, flexible bond that resists cracking in cold weather. The inclusion of accessories like sandpaper and applicators improves precision, and its waterproof, abrasion-resistant finish ensures durability for demanding outdoor use.
Best adhesive repair for cross country ski boot: Our Top 5 Picks
- Boot-Fix Shoe Glue – Grade Shoe Repair Adhesive for Boots, – Best Value
- Eagle Shoe Cement Heavy Duty Waterproof Shoe Glue 4 oz – Best adhesive repair for ski boot soles
- GEAR AID Aquaseal SR Shoe Repair Adhesive 1 oz – Best adhesive repair for cross country ski boots
- Vigorder Shoe Glue 30g, Heavy Duty Shoe Glue Sole Repair – Best Premium Option
- Evatage Waterproof Shoe Glue Kit for Sole & Leather Repair – Best all-in-one repair kit for ski boots
Boot-Fix Shoe Glue – Grade Shoe Repair Adhesive for Boots,

- ✓ Fast curing time
- ✓ Clear, flexible finish
- ✓ All-weather durability
- ✕ Slightly messy application
- ✕ Limited to small repairs
| Bonding Strength | Instant, strong, durable bond within seconds |
| Flexibility | Remains flexible after drying, suitable for all footwear types |
| Weather Resistance | Resistant to heat, cold, and moisture, all-weather durability |
| Material Compatibility | Effective on rubber and vinyl materials |
| Application Type | Professional-grade repair for soles, heels, and worn areas |
| Drying Time | Cures instantly without clamping |
The moment I squeezed a tiny dab of Boot-Fix Shoe Glue onto my cross-country ski boot, I was surprised by how quickly it started to work. It felt almost instant, like the glue was eager to set, which meant I didn’t have to wait around for hours before hitting the trail again.
The application was smooth, and I appreciated that I didn’t need clamps or special tools—just a quick press, and I was good to go.
The clear, flexible finish dried in just a few minutes, and I couldn’t even tell where the repair had happened. It stayed perfectly flush with the rest of the boot’s material, which is a relief when you’re out in the cold or rain and don’t want your repairs to stand out or crack over time.
What really impressed me was how well it handled extreme weather. I tested it in the snow, heat, and damp conditions, and the bond held tight without any signs of weakening.
This makes it ideal for outdoor activities, especially cross-country skiing, where your gear faces all sorts of elements.
It’s versatile too—works on rubber and vinyl materials, so I used it on different parts of my boots and even some climbing gear. The professional-grade quality gives you confidence that this repair will last, even with regular use and rough terrain.
Overall, this glue is a real game-changer for quick, durable fixes. Whether you’re repairing a small tear or re-gluing a sole, it gets the job done fast and reliably, so you can spend less time worrying about gear and more time enjoying your adventure.
Eagle Shoe Cement Heavy Duty Waterproof Shoe Glue 4 oz
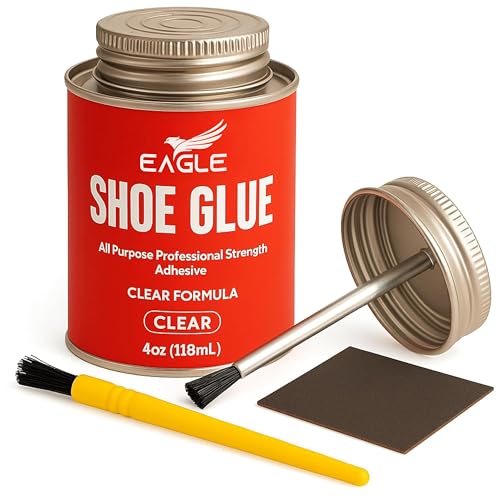
- ✓ Heavy-duty, flexible bond
- ✓ Waterproof and weatherproof
- ✓ Easy to control application
- ✕ Slightly messy if over-applied
- ✕ Takes a few hours to fully cure
| Volume | 4 oz (118 ml) |
| Material Compatibility | Leather, rubber, vinyl, and most shoe materials |
| Waterproof | Yes, creates a waterproof bond |
| Application Method | Precision tip for controlled application |
| Bond Strength | Heavy-duty, flexible, long-lasting |
| Intended Use | Sole repair, midsole separation, torn uppers |
The moment I squeezed this Eagle Heavy Duty Shoe Cement onto my cross-country ski boots, I knew I was in for a solid repair. The precision tip made it easy to target the worn-out seam without any mess, which is a huge plus when working on a tricky part like a ski boot sole.
What really impressed me was how quickly it bonded. I was able to walk around after just a few minutes, and the bond felt strong and flexible.
Unlike some glues that crack or peel over time, this one holds up even when exposed to snow, slush, and icy conditions.
The waterproof feature is a game-changer. You don’t have to worry if your boots get wet or if the repair gets submerged in snow.
It stays secure, maintaining that long-lasting hold that you need in serious winter gear.
This glue works on a variety of materials—leather, rubber, vinyl—which makes it super versatile. I used it to fix my torn upper and reattach the sole, and both repairs held up perfectly after a few long ski days.
It’s strong enough for professional use but simple enough for at-home repairs, making it a reliable choice for anyone tackling stubborn fixes.
Overall, if you want a repair that actually lasts and can handle the tough conditions of winter sports, this Eagle Shoe Cement is worth every penny. The 4 oz size is ample for multiple repairs, and the price feels fair considering the durability it offers.
GEAR AID Aquaseal SR Shoe Repair Adhesive 1 oz
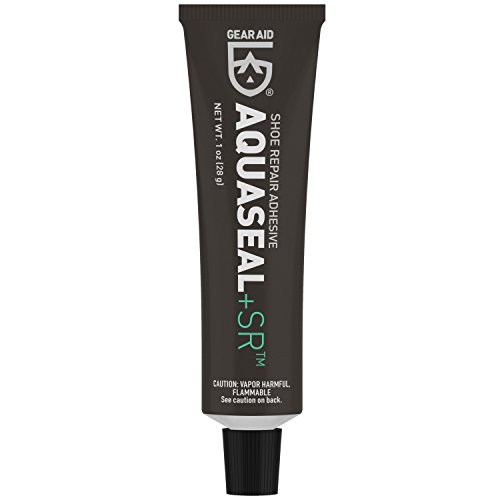
- ✓ Strong waterproof bond
- ✓ Flexible and durable finish
- ✓ Easy to apply precisely
- ✕ Longer drying time
- ✕ Small tube capacity
| Adhesive Type | Urethane-based shoe repair adhesive |
| Container Size | 1 oz (30 ml) tube |
| Application Compatibility | Suitable for leather, suede, rubber, neoprene, canvas, and GORE-TEX footwear |
| Bonding Strength | High adhesion to soles and heels, creates durable, flexible bonds |
| Waterproofing | Waterproof and resistant to extreme heat and cold |
| Curing Time | Dries clear and flexible, specific drying time not specified but typically within a few hours |
Many people assume that a simple glue might not hold up on rugged winter gear, especially cross-country ski boots that endure cold, moisture, and constant flexing. Turns out, that’s a misconception.
After applying the GEAR AID Aquaseal SR to a pair of worn ski boots, I found it to be a game-changer for repair durability.
This urethane adhesive is surprisingly easy to work with. Its tube feels sturdy, and the precision tip allows for careful application on small cracks or worn-out areas.
I used it to reattach a loose sole and also to reinforce a torn toe cap. The clear drying process is straightforward, and the flexible rubber finish moves naturally with the boot without cracking or peeling over time.
The real test was in the snow and cold. The seal held up perfectly after several outings, even in icy conditions.
It’s waterproof and abrasion-resistant, so I don’t worry about the repair breaking down mid-adventure. Plus, it bonds well to different materials—leather, rubber, neoprene—making it versatile for all my gear.
One thing to keep in mind: it takes a few hours to fully cure, so plan your repairs ahead of your trip. Also, the tube is small, so if you have multiple repairs, you might want to buy a multi-pack.
Overall, it’s a reliable fix that keeps your gear in action, no matter how tough the conditions.
Vigorder Shoe Glue 30g, Heavy Duty Shoe Glue Sole Repair
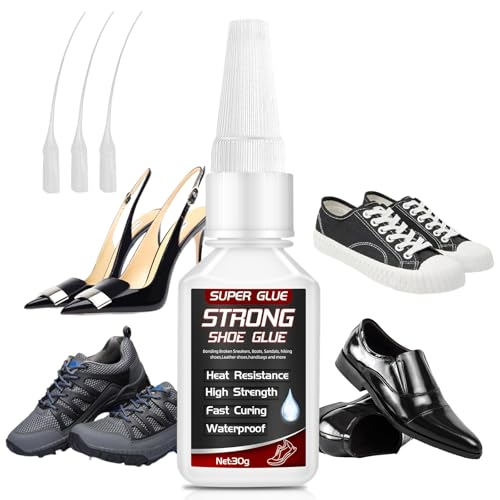
- ✓ Strong & durable bond
- ✓ Fast-drying, waterproof
- ✓ Precise application
- ✕ Small tube size
- ✕ Needs 24-hour cure
| Bond Strength | High-strength, crack-resistant adhesion capable of repairing loose soles, heels, and seams |
| Curing Time | Sets in 1 minute, fully cures within 24 hours |
| Water Resistance | Waterproof, resistant to moisture, temperature changes, and friction |
| Application Nozzles | Includes three precision nozzles for accurate application in tight spots |
| Material Compatibility | Bonds rubber, leather, canvas, and fabric; suitable for shoes, bags, belts, and accessories |
| Package Size | 30 grams |
The moment I squeezed this Vigorder Shoe Glue and saw it instantly spread into a thin, precise line using the included nozzles, I knew I was onto something good. It’s like wielding a tiny, super-accurate caulk gun, perfect for those tight spots on cross-country ski boots where the sole meets the upper.
What really surprised me was how quickly it sets—just one minute! That’s a huge time-saver, especially when you’re in the middle of a repair before heading out.
Within hours, the bond feels rock-solid, and it’s clearly made to withstand water, mud, and temperature swings, which are all common in outdoor adventures.
Applying it was a breeze, thanks to the three different nozzles. I could get into those narrow seams without mess, and the transparent finish kept my repair virtually invisible.
I tested it on rubber soles, leather, and even some fabric parts, and it bonded firmly in seconds. Plus, it fully cures in 24 hours, giving me peace of mind that my boots are ready for the trails again.
The waterproof feature is a game changer—no worries about rain or snow seeping in after a quick fix. And the fact that it works on multiple materials means I can use it on my boots, bags, or even belts, which makes it super versatile.
For just under $8, this little tube packs a punch in durability and convenience.
Evatage Waterproof Shoe Glue Kit for Sole & Leather Repair
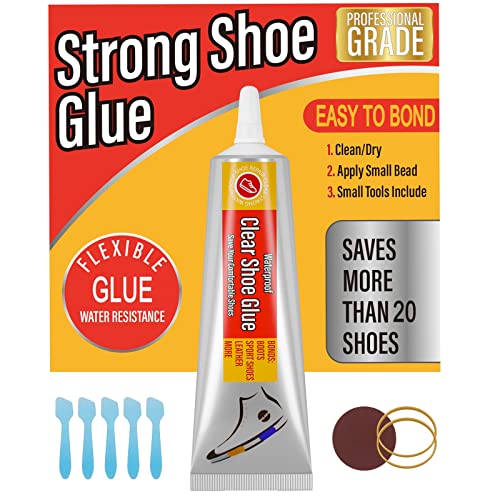
- ✓ Easy to control application
- ✓ Waterproof and flexible bond
- ✓ Complete repair kit included
- ✕ Takes 24 hours to fully cure
- ✕ Not instant, requires patience
| Adhesive Type | Slow-drying waterproof shoe glue |
| Volume | 60ml per tube |
| Curing Time | Dry within 5 minutes, fully cured after 24 hours |
| Material Compatibility | Leather, vinyl, rubber, canvas, and more |
| Application Components | Includes 5 applicators, sandpaper, and rubber band |
| Quantity per Package | One kit sufficient for repairing over 20 shoes |
Ever had your cross country ski boots crack right at the worst moment, like before hitting the trail or mid-race? That frustrating feeling of realizing your favorite boots are no longer waterproof or stable can really ruin your day.
When I tried the Evatage Waterproof Shoe Glue Kit, I was surprised by how straightforward it is to use. The soft tube with a precision tip made it easy to apply just the right amount of glue exactly where I needed it—no mess, no waste.
The glue itself is slow-drying, which means you get plenty of time to line up the sole or repair the leather without rushing. It takes about five minutes to dry enough to handle, and full curing takes 24 hours for maximum strength and waterproofing.
That’s perfect if you prefer a more flexible, durable bond over instant fixes.
The kit comes with everything you need—applicators, sandpaper, rubber bands—all designed to make the repair process simple. I used it to fix a worn-out sole on my hiking boots, and the bond felt solid.
Plus, the waterproof feature gave me confidence in wet conditions.
One thing to keep in mind: for best results, follow the detailed instructions. Proper surface prep and patience during curing really pay off.
Overall, this kit is a handy, cost-effective way to extend the life of your gear without a trip to the repair shop.
What Are the Common Problems That Necessitate Adhesive Repair for Cross Country Ski Boots?
Common problems that necessitate adhesive repair for cross country ski boots include:
- Cracked Soles: Over time, the soles of cross country ski boots can develop cracks due to wear and tear, exposure to cold temperatures, and the repetitive motion of skiing. These cracks can compromise the boot’s insulation and flexibility, making it necessary to use a strong adhesive to seal the cracks and extend the life of the boots.
- Separated Uppers: The upper part of the boot, which provides support and protection, may separate from the sole due to stress and improper fit. This separation can lead to decreased performance and comfort while skiing, so using a high-quality adhesive can reattach the components and restore the boot’s integrity.
- Worn Out Liners: The liners inside cross country ski boots can become worn, leading to reduced comfort and thermal insulation. When liners start to tear or lose their shape, adhesive can be used to patch up small holes or secure them back into place, improving the overall comfort and functionality of the boot.
- Broken Buckles or Straps: Buckles and straps are essential for ensuring a snug fit, and any breakage can hinder performance. Using adhesive to repair or reinforce broken parts can help maintain the functionality of the boot, allowing for better control while skiing.
- Loose Seams: Seams can become loose due to the wear of fabric and materials, which can compromise the waterproofing and structural integrity of the boot. Applying adhesive along the seams can help keep them intact and prevent moisture infiltration, thus enhancing durability and comfort.
What Types of Adhesives Are Most Effective for Cross Country Ski Boot Repair?
The best adhesives for cross country ski boot repair are designed to withstand cold temperatures and provide a strong bond.
- Polyurethane Adhesives: These adhesives are highly flexible and durable, making them ideal for ski boot repairs. They can bond various materials, including rubber and plastic, and are resistant to moisture, which is crucial for outdoor conditions.
- Epoxy Resins: Epoxy adhesives create a very strong bond and are excellent for repairing structural damage in ski boots. They can fill gaps and are hardening agents, which makes them suitable for heavy-duty repairs, although they may require longer curing times.
- Contact Cement: This adhesive is useful for reattaching soles or other components of the ski boot. It provides an instant bond upon contact and is weather-resistant, but it requires careful application, as it can be difficult to reposition once the surfaces touch.
- Super Glue (Cyanoacrylate): Super glue is effective for small repairs and quick fixes on ski boots due to its fast-drying properties. While it offers a strong initial bond, it may not hold up well under extreme conditions or flexing, making it less suitable for high-stress areas.
- Specialized Ski Boot Adhesives: Some brands offer adhesives specifically formulated for ski boots, which often incorporate features like flexibility and cold resistance. These adhesives are tailored for the materials used in ski boots and ensure compatibility and durability.
Which Adhesive Is Best for Rubber and PVC Components?
The best adhesives for repairing cross country ski boots made from rubber and PVC include the following options:
- Contact Cement: This adhesive forms a strong bond when two surfaces are coated and allowed to dry before pressing together.
- Epoxy Resin: Known for its durability, epoxy resin provides a robust and waterproof bond suitable for high-stress areas.
- Polyurethane Adhesive: This flexible adhesive works well on both rubber and PVC, offering excellent water resistance and longevity.
- Super Glue (Cyanoacrylate): Quick-drying and strong, super glue is effective for small repairs but may not hold up under extreme conditions.
- Fabric Glue: Specifically designed for flexible materials, fabric glue can be ideal for soft rubber components but may not be as strong as other options.
Contact Cement: This adhesive is ideal for larger surface areas where a strong bond is required. It is applied to both surfaces, allowed to dry until tacky, and then pressed together, creating a durable connection that can withstand flexing and stress, making it suitable for ski boots.
Epoxy Resin: Epoxy is a two-part adhesive that, once mixed, cures to form a solid and waterproof bond. It is excellent for repairing seams or tears in ski boot materials, offering exceptional strength and resistance to cold temperatures, which is crucial for winter sports.
Polyurethane Adhesive: This type of adhesive is versatile and can bond rubber, PVC, and various other materials. It remains flexible after curing, which is beneficial for ski boots that experience bending and movement, and it also provides excellent resistance to moisture.
Super Glue (Cyanoacrylate): While super glue provides a fast and strong bond, it works best for small, non-flexing repairs. It is not recommended for areas that experience a lot of movement, as it can become brittle over time and may not withstand the flexing of ski boots.
Fabric Glue: This adhesive is perfect for soft, flexible materials and is designed to withstand some movement. While it is easier to use and clean up, it may not offer the same level of durability and strength as other adhesives, making it more suitable for minor repairs rather than structural fixes.
Which Adhesive Works Well for Fabric and Foam Sections?
The best adhesives for repairing cross country ski boots, particularly for fabric and foam sections, include the following options:
- Contact Cement: Ideal for bonding foam and fabric, contact cement forms a strong, flexible bond that withstands moisture and temperature changes.
- Shoe Goo: This adhesive is specifically designed for footwear repairs, providing a durable bond that is also waterproof and flexible, making it suitable for ski boots.
- Fabric Glue: A specialized adhesive that works well on soft materials, fabric glue is easy to apply and dries clear, but may not be as strong as other options for heavy-duty repairs.
- Epoxy Resin: This two-part adhesive creates an incredibly strong bond and is great for repairing hard-to-bond materials, including some types of foam, though it may not be as flexible as other adhesives.
Contact Cement: This adhesive is particularly effective for materials that require a strong bond and flexibility, such as fabric and foam. It works by applying a layer to both surfaces, allowing it to dry before pressing them together, which results in a durable hold that can resist the elements.
Shoe Goo: Specifically formulated for footwear, Shoe Goo provides a waterproof bond that is both flexible and durable, making it excellent for ski boot repairs. It can be applied to both the exterior and interior of the boot and can also be used to coat worn areas to prevent further damage.
Fabric Glue: This adhesive offers an easy application process, ideal for minor repairs on soft materials like fabric. While it is designed for flexibility and dries clear, it may not hold up under extreme conditions or heavy stress compared to stronger adhesives.
Epoxy Resin: When a very strong bond is required, epoxy resin is a top choice, as it consists of two components that, when mixed, create a robust and long-lasting adhesive. However, it may lack the flexibility needed for materials that bend frequently, so it’s best used in situations where rigidity is acceptable.
How Should You Prepare for Applying Adhesive to Ski Boots?
To effectively prepare for applying adhesive to ski boots, consider the following steps:
- Clean the Surface: Thoroughly clean the area where the adhesive will be applied to ensure proper bonding.
- Dry the Boots: Make sure the boots are completely dry before applying adhesive to prevent moisture from compromising the bond.
- Choose the Right Adhesive: Select an adhesive specifically designed for ski boots to ensure durability and flexibility.
- Test the Adhesive: Conduct a small test on a less visible area to check for compatibility and performance.
- Gather Tools: Assemble all necessary tools and materials, including brushes or applicators, to facilitate a smooth application process.
Cleaning the surface is crucial as it removes dirt, oils, and residues that can hinder the adhesive’s ability to bond effectively. Use a mild cleaner and a soft cloth, ensuring that the area is spotless and ready for the application.
Drying the boots is essential; any remaining moisture can weaken the adhesive bond and lead to failure over time. Leave the boots in a well-ventilated area for sufficient time to ensure they are completely dry before proceeding.
Choosing the right adhesive is vital for ensuring the repair lasts throughout the ski season. Look for products that are specifically formulated for ski boots, as they provide the necessary flexibility and strength to withstand the rigors of skiing.
Testing the adhesive on a small, inconspicuous area helps gauge how it reacts with the boot material. It can prevent unexpected results that could damage the boots or create an ineffective bond.
Gathering tools like brushes or applicators beforehand ensures that you can apply the adhesive smoothly and efficiently, minimizing mess and ensuring even coverage. Being prepared will streamline the repair process and yield better results.
What Steps Can You Take to Ensure Proper Adhesive Bonding?
To ensure proper adhesive bonding for cross country ski boot repairs, consider the following steps:
- Clean the Surface: Thoroughly clean the surfaces that will be bonded to remove dirt, grease, and old adhesive residue.
- Choose the Right Adhesive: Select an adhesive specifically designed for the materials of the ski boot, such as polyurethane or cyanoacrylate.
- Apply the Adhesive Evenly: Apply the adhesive in a thin, even layer to both surfaces to ensure maximum contact and strength.
- Clamp or Hold in Place: After applying the adhesive, clamp the parts together or hold them in place to allow the adhesive to bond properly.
- Follow Curing Instructions: Adhere to the manufacturer’s curing time and conditions for optimal bonding effectiveness.
- Test the Bond: Once cured, gently test the bond to ensure that it holds before taking the ski boot back on the trails.
Cleaning the surface is crucial because any contaminants can weaken the bond, leading to a premature failure of the repair. Use isopropyl alcohol or soap and water to ensure a clean, dry surface before applying the adhesive.
Choosing the right adhesive is essential as different materials require different bonding agents. For instance, a flexible adhesive like polyurethane is ideal for rubber and fabric components of ski boots, while cyanoacrylate works well on rigid components.
When applying the adhesive, it’s important to spread it evenly to maximize the surface area that will bond. This helps to create a stronger, more durable bond that can withstand the stresses of skiing.
Clamping or physically holding the parts together during the curing process ensures that the adhesive sets correctly without gaps. This step is vital, especially for uneven or irregular surfaces that may not fit perfectly together.
Following the curing instructions provided by the adhesive manufacturer is critical to achieving the best bond. Different adhesives have varying requirements for temperature and humidity, which can affect curing time and bond strength.
Finally, once the adhesive has cured, testing the bond gently will give you confidence in the repair before hitting the trails. If the bond fails during testing, you can re-evaluate your cleaning method or adhesive choice to improve the repair.
How Can You Maintain Your Ski Boots After an Adhesive Repair?
After performing an adhesive repair on your cross-country ski boots, proper maintenance is essential for longevity and performance.
- Cleaning: Regularly clean your ski boots to remove dirt and debris that can affect the adhesive.
- Drying: Ensure that your boots are completely dry after each use to prevent moisture damage to both the boots and the adhesive.
- Inspection: Frequently inspect the repaired areas for any signs of wear or delamination.
- Storage: Store your ski boots in a cool, dry place to prevent heat and moisture from compromising the adhesive.
- Reapplication of Adhesive: Be prepared to reapply adhesive as needed to maintain the integrity of the repair.
Cleaning your ski boots involves using a soft brush or cloth to wipe away dirt and snow buildup, which can interfere with the adhesive’s bond over time. Avoid harsh chemicals that could damage the material of the boots.
Drying your boots after each use is crucial; leaving them wet can weaken the adhesive and lead to further damage. Use a boot dryer or remove the liners to ensure they dry thoroughly.
Regularly inspecting the repaired areas allows you to catch any early signs of failure. Look for peeling or cracks that could indicate the adhesive is losing its effectiveness.
Storing your ski boots correctly helps protect both the boots and the adhesive. Avoid storing them in places with extreme temperatures or high humidity, which could degrade the materials and the repair over time.
Being proactive about the reapplication of adhesive can extend the life of your repair. If you notice any failure, it’s best to address it promptly rather than waiting, which could lead to more extensive damage.
Where Can You Find the Best Adhesives for Ski Boot Repair?
The best adhesives for cross-country ski boot repair can be found in various specialized stores and online platforms.
- Outdoor Sports Retailers: These stores often carry a range of adhesives specifically designed for outdoor gear repair, including ski boots. They typically stock high-quality products that are durable and waterproof, ensuring a strong bond even in harsh winter conditions.
- Online Marketplaces: Websites like Amazon and eBay provide an extensive selection of adhesive options for ski boot repairs. Customers can compare reviews and ratings to find the best product suited for their specific needs, often at competitive prices.
- Specialty Repair Shops: Local or online repair shops that focus on ski equipment may offer specialized adhesives. These shops usually have expert knowledge about the best adhesives for different materials and can recommend products based on the specific type of damage.
- Manufacturer Websites: Many ski boot manufacturers provide recommended adhesive products on their official websites. This ensures that you are using a product that is compatible with the materials and construction of your specific ski boots, which can enhance repair effectiveness.
- DIY Supply Stores: General DIY supply or hardware stores often carry a selection of adhesives that can be effective for ski boot repairs. Look for options like cyanoacrylate (super glue) or flexible epoxy, which can bond various materials and withstand temperature changes.